Cloud Controller blobstore
Page last updated:
To stage and run apps, Cloud Foundry manages and stores the following types of binary large object (blob) files:
| Blob Type | Description | Location in Blobstore |
|---|---|---|
| App Packages | Full contents of app directories, including source code and resource files, zipped into single blob files. | /cc-packages |
| Buildpacks | Buildpack directories, which Diego cells download to compile and stage apps with. | /cc-buildpacks |
| Resource Cache | Large files from app packages that the Cloud Controller stores with a SHA for later re-use. To save bandwidth, the Cloud Foundry Command Line Interface (cf CLI) only uploads large application files that the Cloud Controller has not already stored in the resource cache. | /cc-resources |
| Buildpack Cache | Large files that buildpacks generate during staging, stored for later re-use. This cache lets buildpacks run more quickly when staging apps that have been staged previously. | cc-droplets/buildpack_cache |
| Droplets | Staged apps packaged with everything needed to run in a container. | /cc-droplets |
Cloud Foundry blobstores use the Fog Ruby gem to store blobs in
services like Amazon S3, WebDAV, or the NFS filesystem. The file system location of an internal blobstore is /var/vcap/store/shared.
A single blobstore typically stores all five types of blobs, but you can configure the Cloud Controller to use separate blobstores for each type. This topic references staging and treats all blobstores as generic object stores.
For more information about staging, see How Apps Are Staged.
For more information about how specific third-party blobstores can be configured, see Cloud Controller Blobstore Configuration.
Staging using the blobstore
This section describes how staging buildpack apps uses the blobstore.
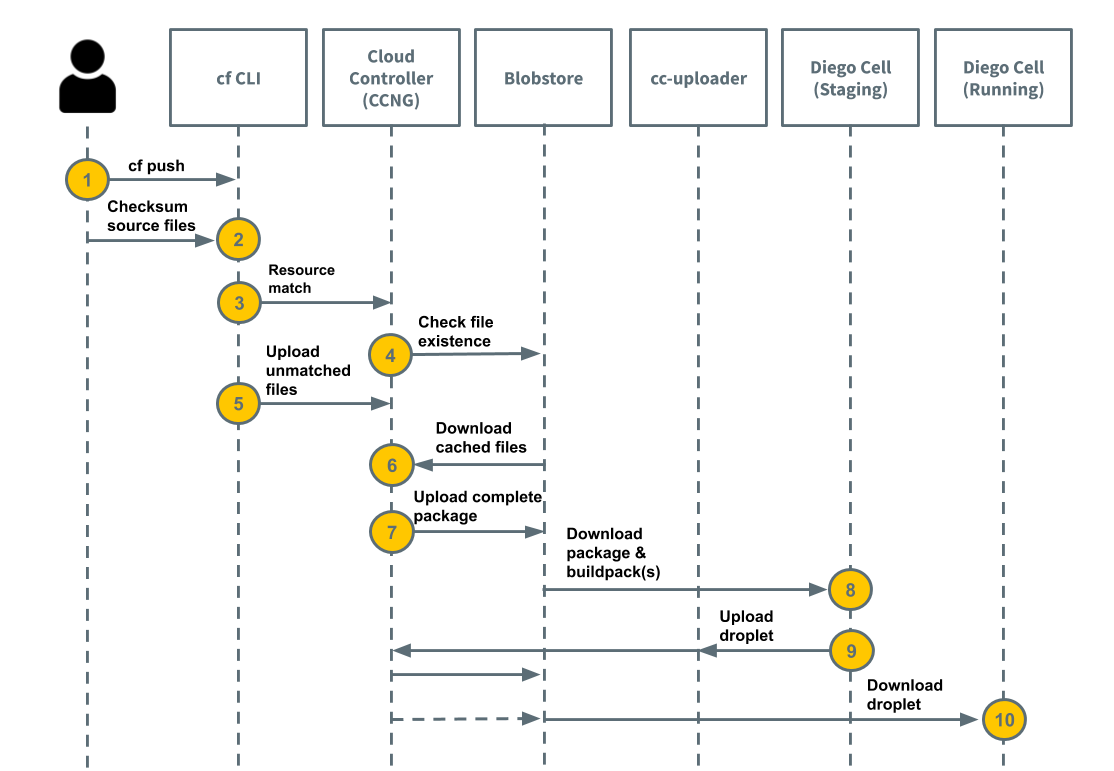
The following diagram illustrates how the staging process uses the blobstore. To walk through the same diagram in an app staging context, see How Diego Stages Buildpack Apps. The staging process for buildpack apps includes a developer and the following components: CF Command Line, Cloud Controller (CCNG), Blobstore, cc-uploader, Diego Cell (Staging), and Diego Cell (Running).
- Step 1: cf push from Developer to CF CLI.
- Step 2: Checksum source files from Developer to CF CLI.
- Step 3: Resource Match from CF CLI to the CCNG.
- Step 4: Check file existence from the CCNG to Blobstore.
- Step 5: Upload unmatched files from CF CLI to CCNG.
- Step 6: Download cached files from Blobstore to CCNG.
- Step 7: Upload complete package from CCNG to Blobstore.
- Step 8: Download package and buildpack from Blobstore to Diego Cell (Staging).
- Step 9: Upload droplet from Diego Cell (Staging) through cc-uploader, then CCNG, to the Blobstore.
- Step 10: Download droplet from Blobstore to CCNG.
The process in which the staging process uses the blobstore is as follows:
cf push: A developer runs
cf push.Create app: The Cloud Foundry Command Line Interface (cf CLI) gathers local source code files and computes a checksum of each.
Store app metadata: The cf CLI makes a
resource_matchesrequest, which matches resources to Cloud Controller. The request lists file names and their checksums. For more information and an example API request, see Resource Matches in the Cloud Foundry API documentation.Check file existence includes the following:
- The Cloud Controller makes a series of
HEADrequests to the blobstore to find out which files it has cached. - Cloud Controller content-addresses its cached files so that changes to a file result in it being stored as a different object.
- Cloud Controller computes which files it has and which it needs the cf CLI to upload. This process can take a long time.
- In response to the resource match request, Cloud Controller lists the files the cf CLI needs to upload.
- The Cloud Controller makes a series of
Upload unmatched files: The cf CLI compresses and uploads the unmatched files to Cloud Controller.
Download cached files: Cloud Controller downloads, to its local disk, the matched files that are cached in the blobstore.
Upload complete package includes the following:
- Cloud Controller compresses the newly uploaded files with the downloaded cached files in a ZIP file.
- Cloud Controller uploads the complete package to the blobstore.
Download package & buildpack(s): A Diego Cell downloads the package and its buildpacks into a container and stages the app.
Upload droplet includes the following:
- After the app has been staged, the Diego Cell uploads the complete droplet to
cc-uploader. cc-uploadermakes a multi-part upload request to upload the droplet to Cloud Controller.- Cloud Controller enqueues an asynchronous job to upload to the blobstore.
- After the app has been staged, the Diego Cell uploads the complete droplet to
Download droplet includes the following:
- A Diego Cell attempts to download the droplet from Cloud Controller into the app container.
- Cloud Controller asks the blobstore for a signed URL.
- Cloud Controller redirects the Diego Cell droplet download request to the blobstore.
- A Diego Cell downloads the app droplet from the blobstore and runs it.
Blobstore Cleanup
How Cloud Controller reaps expired packages, droplets, and buildpacks
As new droplets and packages are created, the oldest ones associated with an app are marked as EXPIRED if they exceed the configured limits for packages and droplets stored per app.
Each night, starting at midnight, Cloud Controller runs a series of jobs to delete the data associated with expired packages, droplets, and buildpacks.
Enabling the native versioning feature on your blobstore increases the number of resources stored and costs. For more information, see Using Versioning in the AWS documentation.
Automatic Orphaned Blob Cleanup
Orphaned Blobs are blobs that are stored in the blobstore, but Cloud Controller does not list in its database. These are distinct from Expired Blobs, which Cloud Controller can still link to a particular package, droplet, or buildpack.
Orphaned Blobs are typically created after a blob deletion fails silently or something else goes wrong.
Cloud Controller detects and removes Orphaned Blobs by scanning part of the blobstore daily and checking for any blobs that its database does not account for. The process scans through the entire blobstore every week, and only removes blobs that show as orphans for three consecutive days.
Cloud Controller performs this automatic cleanup when the cloud_controller_worker job property cc.perform_blob_cleanup is set to true.
Two instances of Cloud Foundry should not use the same blobstore buckets, as the uploaded blobs will be marked as ‘orphaned’ by the other Cloud Foundry instance and deleted.
Manual blob cleanup
Cloud Controller does not track resource cache and buildpack cache blob-types in its database, so it does not reap them automatically as it does with app package, buildpack, and droplet type blobs.
To clean up the buildpack cache, admin users can run cf curl -X DELETE /v2/blobstores/buildpack_cache. This empties the buildpack cache completely, which is a safe operation.
To clean up the resource cache, delete it as follows:
- Internal blobstore: Run
bosh sshto connect to the blobstore VM (NFS or WebDav) andrm *the contents of the/var/vcap/store/shared/cc-resourcesdirectory. - External blobstore: Use the file store’s API to delete the contents of the
resourcesbucket.
Do not manually delete app package, buildpack, or droplet blobs from the blobstore. To free up resources from those locations, run cf delete-buildpack for buildpacks or cf delete for app packages and droplets.
Blobstore load
The load that Cloud Controller generates on its blobstore is unique due to resource matching. Many blobstores that perform well under normal read, write, and delete loada are overwhelmed by Cloud Controller’s heavy use of HEAD requests during resource matching.
Pushing an app with large number of files causes Cloud Controller to check the blobstore for the existence of each file.
Parallel BOSH deployments of Diego Cells can also generate significant read load on the Cloud Controller blobstore as the cells perform evacuation. For more information, see the Evacuation section of the App Container Lifecycle topic.
Blobstore interaction timeouts
Cloud Controller inherits default blobstore operation timeouts from Excon. Excon defaults to 60 second read, write, and connect timeouts.
For more information, see the excon repository on GitHub.
View the source for this page in GitHub